Friday, April 29, 2011

Restore Deleted Files and Folders With WinUtilities

Have you delete important files or folders by mistake with shift + del key? If it were so, surely you are confused dizziness because if that file is typed ms word, then you have to type it again, the more chaotic if the file is a file associated with financial data.

temukan file dengan winutilities undelete

WinUtilities Undelete is a free data recovery tools that can help you to find the data is permanently erased (with shift + del) and return it. This tool can recover files and folders that were deleted from the internal hard disk and external storage devices. This tool also support to digital camera memory card is formatted and can recover deleted images.

winutilities

Very easy to use. After installation, open the application and click the name of the drive where you want to search for lost files on the left side. This tool will begin scanning all files on the drive and then display the deleted files and folders that can be found.

winutilities undelete

On the left sidebar, next to the bottom you will find a folder with the name "All Deleted Files. " Click the folder to view all files that were deleted on the right side. Right click on one of them or select them all and select the option "Undelete" from right-click menu.

Features:

Find more files, folders that were deleted from the internal and external storage devices.
This tool can also find MP3 files and AVI video mode with an advanced scan.
Very nice, fast and very user friendly interface.
Available for Windows 7, 2000, XP, Vista, 2003 Server. 32/64bit version.

WinUtilities Undelete v.3.1


Download Free FLV Converter

Free FLV Converter is software for Windows to convert Macromedia Flash FLV format to be one of many video formats you want. FLV format itself is known as a flash video format and the extension is ". Flv". Currently, flash flv format is very popular and widely used by anyone who wants to publish the video stream on the internet. Many popular web sites whose content the dominant form of videos to choose FLV format, for example youtube, google video, etc.

With the FLV Converter, you can convert your flv video content into other video formats commonly used on desktop computers, mobile phones, laptops and other equipment such as audio player. Conversion are available in the format: avi, mpeg-1, mpeg-2, mp4, mov, ipod, psp, iphone, 3gp and mp3. To mp3, FLV Converter will convert the audio stream is a carrier only if the mp3 audio format only.

FLV Converter can also be downloaded in the form of portable, stand alone version, exe files that you can run from removable USB devices without having to go through the installation procedure.

FLV Converter is created with a simple interface, user friendly and easy to understand for anyone. All basic activities can be done from the toolbar. It is possible for you to add and sort many files to convert them all at once. You can even add a flv files by drag and drop which usually can be done on a computer with Windows OS.

Also, you can always check the file with a preview option before you add it to the list and start converting. FLV Converter gives you the opportunity to customize the output file encoding options, such as setting quality, audio and video bit rate, frame rate per second and other options.

For more information on how to use FLV Converter, please see the online help his official website.

FLV Converter is a free software, FLV Converter application is not purely ad in its use, no malware and badware. FLV Converter will not connect to the internet discreetly and gather information about the user and the system.

To download FLV Converter please click the link below:

Current version: 3.2.4.30
Release date: 07/27/2010.
Operating System: Windows XP, Windows Vista, Windows 7
Installation type: Both installed and portable version available, choose bellows.

FLV Converter standard version:
http://www.flv-converter.org/download/flvconverter_setup.exe

FLV Converter is a portable version:
http://www.flv-converter.org/download/flvconverter_portable.exe


Friday, April 22, 2011

Creating Hardisk Partitions in Windows 7

Creating Partitions in Windows on Microsoft's previous operating system such as Windows actually can also easily create partitions, but can not directly when the windows operating system is running, unless the use of certain auxiliary software.

Excess in Windows 7 is able to directly create partitions on windows without the help of other software. When Windows 7 installed for the first time usually use only one partition is drive C: as partitions. Partition is what will we divide in this tutorial. Distribution of this partition is known as shrinking the System Partition.

Note: Although this article specifically discusses the dividing partition system, the procedure described here can be used to shrink the partition ANY, not just the system partition. Also note that the partition dividing the system does not require a reboot and does not eliminate any files on shared drives.
Here are the steps;

  • Please you log on as Administrator.
  • Go to [Control Panel> System and Maintenance> Administrative Tools> Computer Management]. Another way is to right click on Computer icon on the desktop and select [Computer Management]. If you are prompted to enter an administrator password or confirmation, type the password or provide confirmation.
membuat partisi windows
  • Click the arrow on the [Storage] and will open the Disk Management console. See picture
;membuat partisi

  • Select your hard disk partitions to be divided, for example, in this example Drive C.
  • Right-click the disk you want to share and select [Shrink Volume].
partisi hard disk

  • The process will take some time, until the system shows the structure of the partition.
  • In the next window by default the system will automatically divide the size of each partition of old and new. You can change the size of the partition. Please note, once again, that this measure relates to the actual amount of free space on the partition to be shared. You can not take the space exceeds the amount of fragmentation of files on that partition. When finished, click the button [Shrink].

partisi hard disk

  • This process will be completed quite quickly, and reboot NOT needed. You can see the new partition size. The process is complete.


How to use GPS Tracking in Blackberry

For you who has a Blackberry that there are facilities GPS (global positioning system), must have been very friendly with Blackberry Map. Really helps us when you're on a journey, because the GPS will be directly detected position / point where we are at that time.

Which will be discussed this time is how we use Blackberry as GPS Tracker GPS, so that our journey can be monitored / monitored remotely via the Internet in real time.


Steps:
1. List (free) in http://www.instamapper.com/bb, select the sign-up and complete the data2 which must be filled. once registered you will be given a 'device key' (a series of numbers), device key is to be used and entered on our blackberries.

2. On the blackberry should install GPS Tracker application
To install the GPS tracker app's how Open World, use the search to facilitate the search with the keyword 'gps tracker'
search results there are many, and which should we choose is the GPS tracker from InstaMapper LLC. Then download and install.

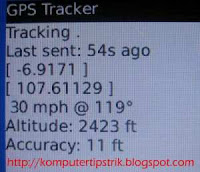
3. Once installed, the GPS tracker will be asked for the number Device Key, enter the key devices that have been obtained when the register of Instamapper earlier.

4 Run at Blackberry GPS Tracker (when it detects the satellite, the data GPSnya (longitude, latitude, altitude) is directly transmitted, and it can be read via the internet).


To monitor, open the internet on the computer and into http://www.instamapper.com/bb then log in using user who have registered earlier.
Once logged in, we can see the position where the blackberries are and movement.

In addition to real time, we gps data is also stored in the database instamapper, so we still can open / view it at a later time .

There are a few things to note for Blackberry Gps tracking this:
The first, of course, should the existing Blackberrynya GPS.
Then Blackberry service should be with service Full service.
On time delivery of data can of course only when there are signals from cellular operators.
For tracking with a long time (long journey), because the data transmission process is done continuously, the battery will run out faster, you should be prepared also power external (mobile charger).


We have had many service providers in the vicinity of these GPS Tracking our professionally managed, not free, we have to buy / rent the device and service from these providers gps tracking. Able to be applied in rental cars, or in movable assets other precious .. etc.

This tips is only as an alternative to utilize existing facilities on the Blackberry. Hopefully useful.


Removing the default search engine Ask.com from Mozilla Firefox

Can be intentional or not, but mostly not intentional, your default browser search engine became to Ask.com, this usually happens because we are installing the toolbar or freeware application that there was a relationship with Ask.com, so that you become the default web search to ask.com.

If you feel bored or annoyed by the existence of this ask.com the search engine, as I feel, yes it should be removed and replaced again with google.com.

In Firefox browser, to eliminate them and restore the default search engine to google.com follow a few simple steps below:

-Open your firefox browser
In the Address bar, type about: config click Go or press Enter,
-Click I'll be careful, I promise


-In Filter column, type keyword.url


Double-click keyword.URL
-Replace String Value, which was http://www.ask.com ....
become http://www.google.com/search?ie=UTF-8&oe=utf-8&q =


-Click OK,
Now your Firefox default search engine Ask.com is no longer, but Google.com.


Monday, April 18, 2011

How to Use Playstation PS3 Controller on PC

In a simple solution this time, I discovered how to use the Playstation PS3 Controller on a PC. PS3 Wireless Controller can be useful as a mouse or joystick to play games. I myself use a PS3 controller to play emulator games are sometimes long run from the computer. We will use the PS3 Controller Windows driver MotionInJoy made ​​in this tutorial.

How do I use the Playstation PS3 Controller on PC

  • Download and unzip the 32 Bit or 64 Bit Windows Drivers PS3.
  • Run MotionInJoy exe, follow the instructions to install the software.
  • Put your PS3 controller via USB port on your PC.
  • Click on the shortcut DS3 Tool to start the program, then navigate to the Driver Manager Tab.
  • (1) Check the list of Driver (2) Click the Load driver
  • PS3 Controller
  • Remove and reinsert your PS3 controller, and then click the Home button. If all goes well, you should have already detected the PS3 Controller.
  • Playstation PS3 Controller
  • You can select the mode you want to use and click enable to enable it.


Twitter Delicious Facebook Digg Favorites More