Wednesday, December 29, 2010

Conducting Remote Desktop Connection With TeamViewer


Remote Desktop Connection Dengan TeamViewer

We can control a computer remotely, using certain software and Internet networks. The problem is, most software requires a lot of settings that are technical and too complicated. However, the software is now available that can help you control your computer remotely with very easily.

TeamViewer is a software that allows us to do desktop sharing over the Internet. We can control our partner computer located elsewhere, and do things. All this is very easy to do, and even we do not need to bother with things that are technical, such as firewalls, IP addresses, or NAT.

Indeed we can find many similar software, but TeamViewer provides solutions for all types of needs. TeamViewer is very simple and easy to use. We do not even need to install it first. We just need to run this software on our computers, and of course on the computer that we want to control from afar.

We can do many things with the help of TeamViewer. For example, we can show our desktop to our partners, and share product demos, presentations, and so forth. We also can use TeamViewer to control a server.

We can download and use TeamViewer free of charge, provided for non-commercial purposes. On his official website www.TeamViewer.com available several versions of TeamViewer, which TeamViewer full version, as well as several other versions for more specific purposes, such as to provide customer service, to control the server, and so forth.


Download Free Flash Game


Game flash is one type of game that flourished as entertainment. In addition to offering many variants, flash games are also light enough so that the computer "old" anything you still can play flash games smoothly.

If you are diligent surfing the internet of course you know there are many sites that offer flash games that can be played online. Of course, to play these games you should always connect to the internet. How about a chance at that time there was no internet connection when you want to play flash games? The solution of course to first download and play flash games offline.

Free-soft.ro is one site that provides a flash game that you can download for free from this page
http://www.free-soft.ro/download.html

There are several download options to choose from. For the full version with size 93 MB are 700 flash games. If the size is considered too large, you can download partially, with a file size of 8 MB - 17 MB with a number of flash games between 50-140. Download these partially suitable for your internet connection substandard.


Stop the Process From the DOS Prompt

To stop the processes (applications and services) that are running on Windows I'm sure you often do it from the Windows Task Manager.

Besides these ways, there are other ways you can do that is with the DOS Prompt. The trick is as follows:


Go to dos prompt by typing cmd from the Start menu - Run.
Write tasklist and hit enter, it will show a list of running processes such as the image below:

Find the name of the process that you want to stop, then look for its PID number.
Suppose you want to stop the Firefox program, then wrote: tskill 1844, then hit enter.
Completed


Free Download Webroot Spy Sweeper 2011

Download Gratis Webroot Spy Sweeper 2011

Webroot Spy Sweeper 2011 is the software that will help protect your computer from spyware attacks. The software has features that are strong enough to detect and eliminate various problems of the spyware.


Broadly speaking Webroot Spy Sweeper 2011 has the following features:

Advanced Anti-Spyware Detection and Removal
Real-Time Anti-Spyware Solution
Enhanced Rootkit Discovery Methods
Always the most current anti-spyware solution
Easy to Use
Minimal Impact on Computer Performance
Accurate Risk Assessment
Uninterrupted Games and Movies
Webroot Software Spy Sweeper 2011 sold for $ 29.95, but within the framework of promotion you can get Webroot Spy Sweeper 2011 for free for life of 6 months. Way, please visit the facebook page here.


Download Free McAfee Internet Security 2011

Download Gratis McAfee Internet Security 2011
Continuing the promotion earlier, antivirus company McAfee again provide a free license for one of their products, namely McAfee Internet Security 2011. McAfee Internet Security 2011 is the protection software that combines antivirus, antispyware and firewall to provide maximum protection on your computer.


To obtain the McAfee Internet Security 2011 for free for six months following way:

- Go to http://us.mcafee.com/root/landingpages/affLandPage.asp?affid=773&lpname=272multi&cid=70235
- Click the Get Started Now
- Enter your name, email address and password, then click I Agree button
- Login to your account page on McAfee by using data that you just created
- Click the Get My Trial to download McAfee Internet Security 2011


Thursday, December 23, 2010

Restrict Access to USB Flash Drive

There are 2 things that cause a USB flash disk storage media (and / or external hard disk) can not be accessed, the first due to accidentally access the disabled and the second, protected access. For the second reason will usually appear the message "The disk is write-protected". By editing the Windows registry, you can manage both.


Enable-Write Protected Disk

In these conditions, USB still readable, but can not be written or to store data. If you want to save the data will show a message like this:
disk write-protected

To open access to the flash disk to copy data:
1. Open the registry editor windows: start menu -> Run -> type: regedit -> OK
2. Find the following key: HKEY_LOCAL_MACHINE \ SYSTEM \ CurrentControlSet \ Control \ StorageDevicePolicies
3. If at any WriteProtect the right panel, double click and fill in the section data value 0 or delete WriteProtect or can also delete the key StorageDevices. Then refresh (click F5).
4. Try out the USB Flash Disk, then plug it in again and repeat the copy data.

Restrict Access to USB Flash Drive

As for the computer to restrict user can not write, copy or move data in flash disk, perform the following steps:

1. Open the registry editor windows: start menu -> Run -> type: regedit -> OK
2. Find the following key: HKEY_LOCAL_MACHINE \ SYSTEM \ CurrentControlSet \ Control
3. Create a new key by right click and choose New-> Key. Give the name StorageDevicePolicies.
4. Then open the key StorageDevicePolicies. Right-click select New -> DWORD Value named WriteProtect.
5. Double click WriteProtect, in the value of data and fill with a value of 1.
6. Such changes above should be done also in:
- HKEY_LOCAL_MACHINE \ SYSTEM \ ControlSet001 \ Control \ StorageDevicePolicies
- HKEY_LOCAL_MACHINE \ SYSTEM \ ControlSet002 \ Control \ StorageDevicePolicies

Well after all is set as the above steps, all users (users) who use computers will not be able to write, to copy or move data in flash disk without having to restart the computer first. So that would appear Write-Protected Disk message as above

Tips:
If the effect of the changes are not directly visible, restart the computer first.


Tips for Flash Disk Long-lasting & Durable

USB Drive
The picture on the left is an internal component of a common flash drive

Description:
1. Connection USB Flash Drive
2. USB mass storage controller device
3. Point - the point Experiments
4. Flash Memory Chip
5. Crystal Oscillator
6. LED
7. Write-protect switch
8. Empty space for the second flash memory chip
We have a lot of external data storage media which has a variety of shapes and sizes of data such as memory chips, an external hard drive and flash of course. But for practical reasons, it seems that the flash is still the choice for most people although it's more popping up an external hard drive range of brand and clearly has the data storage space much larger than the flash. This is due to its small so easy to carry and storage, as can be inserted in a pocket for example.

Of course, besides having the advantages as mentioned earlier, the flash disk it could be vulnerable to damage if the user is less understanding of the nature of the flash and customs in use plus other things that can affect the age of the flash.

That's what this article is presented to help you how to take care and keep Flashdiskawet in terms of equipment can work well and durable:

1. Avoid contact with water.

Keep the flash is not to get exposed to water, rain or even submerged in water. Things like the above can result in damage to components inside that may result can not terbacanya data means data loss forever. Indeed there are several brands that dare to claim that anti-product water (waterproof), but the safest step is to keep the flash from the affected water.

2. Keep it away from the influence of strong magnetic fields

Try to put the flash on when not in use in a safe place from the influence of strong magnetic fields, such as TV, mobile and large-sized speakers. Many of us on the grounds within easy reach and easy to remember often put small items like keys, including flash on TV. Well, this is wrong. Flash should not be placed there, because the TV has the effect of very strong magnetic field. So also put the flash into one with HP do not do, like save the flash and HP in the same pocket.

3. Get used to pull the flash when it's safe
USB Drive_0

Get used to always pull the flash from the plug (USB Port) after completion used to eject the correct process. Do it always with doing a stop on the "Safely Remove Hardware" from the computer and unplug after notice "Safe To Remove Hardware" appears on the screen. This is done so as not to affect the data files stored on it. Flash is not ready to be revoked is usually because there is still a running process (data transfer) or else the process of the virus at work.


4. Always make sure the virus scan with an updated antivirus.

Transfer data from computer to the flash is very vulnerable to the migration of the virus if the home computer has been infected by the virus. Moreover, when you save data from the cafe after a download or just copy the data. It is no secret that the cafe has been a "nest" or "media" (more accurately perhaps?) for the virus to move and launch his evil actions utilizing flash and make the distribution to a personal computer. To make sure the flash is fully scanned once used to move data with antivirus that is always updated.

5. Keep away from heat

Flash also has no heat resistant properties as well as other electronic goods. Do not put flash in the hot areas, such as above the dashboard of a car that was left under the hot sun because the heat generated or the car itself. Also keep it away for the flash does not hit something hard or frequent falls.

6. Always put the cap back

When finished use put the cap back on properly. This was done to avoid the entry of undesirable impurities such as dust or foreign objects that could result in failing the familiar flash when inserted in USB Port. It also can lead to failure of the read / write data in flash.

7. Minimize erase-write process

Usually the flash has the power to survive (read: age) up to 100,000 times the process of writing clear. Various kinds of brand flash on the market have different qualities and prices that also affect the useful life of the flash is concerned. However, it is not absolute. It would be nice if we get used to minimize the process erase-write flash for flash is more durable age. Get used to work carefully and correctly so we do not repeat to save on the flash that means repeating the process of writing on the flash. Minimize edit data directly on the flash. Should do well on computer editing, after all correct and no correction then move into the flash.
Also not recommended to run the program directly stored in the flash, although the mini-games or portable applications, because it will reduce the age of the flash itself. Move the first program into a computer.


Speed Up Windows Startup

How long did you wait when you first turn on the computer to go into the desktop display on the screen? Is there any need to wait until about two minutes or even more? Although we can hardly wait, but if this should happen every time we turn on the computer, let alone the need for immediate use. I think we not going too impatient.

The length of time, usually because of too many applications that participate in the startup process. This can happen because of our habit to install an application without reading the instructions and pay attention during the install process. Why? Because of the potential on display at step setup wizard install you unknowingly clicking on the "Yes" when asked whether to include a program on startup position.


In this article will explain about the startup configuration in Windows to boot time, only certain programs that come loaded on the startup process. To find out which applications are involved in start-ups can be seen through the startup folder and then to delete it. But to be certain to also through the system configuration. Here are the steps:

- Click the Start menu -> Run
- Type msconfig and click OK
- Box will appear the System Configuration Utility. On the General tab choose Selective Startup.


general_tab

  • Then click the Startup tab. There are several options a few applications that are allowed to participate in the startup. Eliminate your check box to disable from startup.
startup

  • Then click the Service tab. You must be careful and understand well in doing your settings in this tab. Because here many XP systems are shown. Do not get off the wrong item.
Image and video hosting by TinyPic

  • For more safe click on the Hide All Microsoft Services box. Afterthat will be shown several items of applications in XP system. Uphere you can remove you at the check box.
Image and video hosting by TinyPic

Click OK. To be able to see the results click Restart.

Note:

- Tips are only for Windows XP Professional.
- Images displayed in the example is the System ConfigurationUtility from the Windows XP ProfessionalService Pack 3.


Wednesday, December 15, 2010

Dual boot Windows 7 and Windows XP

You may not be familiar with Windows 7 because the new install it on your PC or Laptop, then you also want to install Windows XP as well, the following steps must be performed before starting the installation of Windows 7 and Widnows dual boot XP.

If you have 2 partitions your hard drive in Windows 7 you have to make the partition back to Windows XP installation location, here you do not need third party software to partition hard drives because Windows 7 already provides a feature inherent to it.

1. Create partition in Windows 7


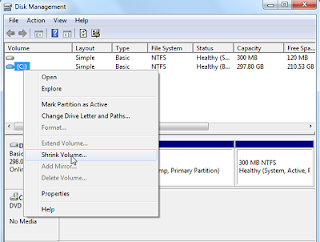
The way the start button on your search box type in "disk management" and press enter and disk management window will open.

2. Making Shrink Volume


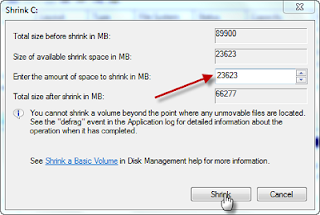
If you want to take a partition of the drive Dirve C and D, right click on the drive that you specify and select Shrink Volume.


Now input the value of the allocation of disk space you want in the box "Enter the amount of space to the shrink in MB" and click the Shrink button.


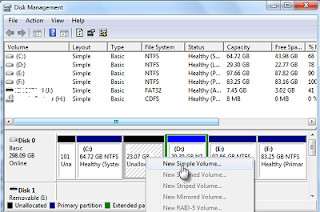
3. New simple volume wizard at this stage click next on the first page and click Next again on the option "Specify the volume size" and click next


hen you will find a page like the above here you do not need to click next last setting you click Finish. In this stage finish to create a partition for your XP installation location Widnows later.


4. Install Windows XP on. For how to install Windows XP you can read the following post

How to Install Windows XP

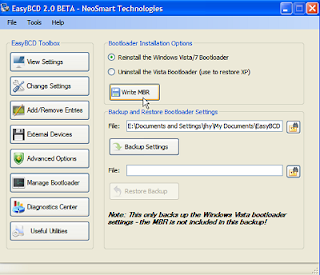
5. Create a Boot Loader After successful installation of XP to get good XP and Windows 7 as an option on the boot screen you can use a free utility EasyBCD.

EasyBCD is a software that can help us to organize and manage the booting of your PC and software is useful if you use the operating system more than one kind.


Install EasyBCD and run the loader and click on manage click Write MBR.


Twitter Delicious Facebook Digg Favorites More